To upgrade Parallels Pro Control Panel to version 10.3.2, you need to run the EPWUpgrade.10.3.2.exe file. Before starting the upgrade, EPWUpgrade.10.3.2.exe backs up all the files that are replaced during the upgrade including the .po files and the Parallels Pro Control Panel database, in the directory from where the EPWUpgrade.10.3.2.exe is executed. If the EPWUpgrade.10.3.2.exe is executed from the C: drive, then the location where these files are backed up is C:\EPWBackup.
You can upgrade Parallels Pro Control Panel from version 10.2.0 to 10.3.2 using the instructions given below.
To upgrade to Parallels Pro Control Panel 10.3.2:
Upgrade directory on the CD, where the EPWUpgrade.10.3.2.exe file is located.If you have downloaded the Parallels Pro Control Panel 10.3.2 installation files from the location given in the purchase order email from Parallels, open a command window, and change to the directory where you downloaded the installation files. Then change to the Upgrade directory, where the EPWUpgrade.10.3.2.exe file is located.
EPWUpgrade.10.3.2.exe. Provide the backup location where the data needs to be backed up. Click the Start Upgrade button in the Upgrade wizard window to begin the upgrade.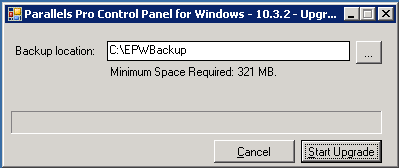
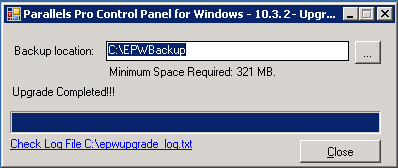
Parallels Pro Control Panel is upgraded to version 10.3.2.